Hello to you all!
 So you'll end up with 2 pieces like these on the photo


The 2 pieces assembled by the base gives this result

Now to draw the heart must be a template. It's very simple Open your Word and down on the bar there is "AutoShape" and in this tab it is "basic shape" We see a heart that is one I used. The only thing to do is to enlarge the width of the core is 9 cm and height 7 cm. You print and cut

Then you put it on the front well for the center. You draw
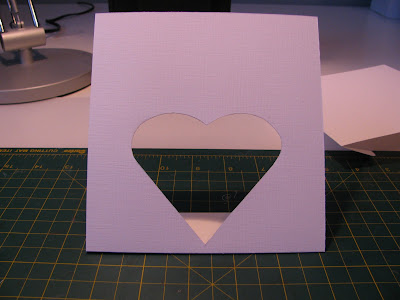
 It gives this

You cut with your scissors
is the result
 I then inked with a stamp but frankly it does was not great, I did not like the result mainly of the left side

I did not taste all over again so I searched and found a nice paper that would save the situation Prima ...


We now turn to bag delicacies ... I bought mine at Dollarama J, once I put this good Lindt chocolates must cut a strip of 10 cm x 13cm You will fold in half and staple it all you

You must insert the chocolate inside and carefully consider everything before making the holes. I used the crop a dile I made small marks that I drilled it is equal to 4 cm and 10 cm

We pass the tape starting at the front it happens in every hole, so the bag is to be securely attached
 We go behind

We must end this way

It attaches all, we had a nice decor and voila!

I show you the glue that I use when I stick a lot of foliage with flowers.
You know you make me laugh? When I posted my little goody bag I had a dozen emails telling me: I Euhhh nice looking but I do not see your tutorial for your beautiful bag? Could you tell me where is it?? euhhh? You know what? You're pretty spoiled rotten girls! MDR! When I do a little trick you expect me to do the tutorial ... no less! It's long but you know to do good as I adore you and you'll make me all full of comments (you're better ... MDR!) I will therefore present. He will do with the pictures a bit dark because I did this afternoon in my scraproom during my nap Sleeping Beauty ...
Please copy and paste this image and print model is not to scale of course!
So you'll end up with 2 pieces like these on the photo the longer it should make a nice finish for the flap of the bag. I used a template
here I show you various templates that I have accumulated over the years. They are Coy My Mind's Eye They are regularly going to the collections. However, you can use a punch edge and the result is so beautiful.
Now to draw the heart must be a template. It's very simple Open your Word and down on the bar there is "AutoShape" and in this tab it is "basic shape" We see a heart that is one I used. The only thing to do is to enlarge the width of the core is 9 cm and height 7 cm. You print and cut
Then you put it on the front well for the center. You draw
It gives this You cut with your scissors
I then inked with a stamp but frankly it does was not great, I did not like the result mainly of the left side I did not taste all over again so I searched and found a nice paper that would save the situation Prima ...
We now turn to bag delicacies ... I bought mine at Dollarama J, once I put this good Lindt chocolates must cut a strip of 10 cm x 13cm You will fold in half and staple it all you
You must insert the chocolate inside and carefully consider everything before making the holes. I used the crop a dile I made small marks that I drilled it is equal to 4 cm and 10 cm
We pass the tape starting at the front it happens in every hole, so the bag is to be securely attached
We go behind We must end this way
It attaches all, we had a nice decor and voila!
I show you the glue that I use when I stick a lot of foliage with flowers.
It is found in every Walmart in the crafts section.

I hope you like my tutorial, it is not difficult to do and it is a small format that may be suitable for different occasions.
Good scrap! See you soon!
0 comments:
Post a Comment